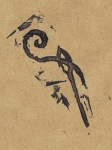
I couldn’t resist: I went out and bought the bargain pack of erasers, 7 for £1. Nice little rectangles, approx. 3/4″ wide x 2″ long x 3/8″ deep. I drew my pattern freehand onto the first eraser, with a fine point Sharpie (currently 5 for £1!).
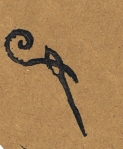
 With my craft knife, I outlined the pattern, trying to take care to angle the blade outwards from the line I was drawing. Then I cut inwards from the outer edge, and sliced out chunks of the surface around the pattern. At first, I was very impressed with how smooth and easy it was to cut. Then I noticed how the once smoothly outlined lines were actually flaking off leaving little ragged edges behind. On my first test print (above right), it is most obvious around the eye of the needle, and you can also see ‘feathering’ along the edge of the swirl of thread.
I decided not to worry about the flakiness, as this was just a practice run to get used to the technique of carving. I just made sure to be as careful as possible to avoid knocking any bits off if I could help it, and tried to neaten up any especially ragged areas. I carved away more of the background area and, in the end, just cut off the uncarved areas of the eraser – the easiest way to avoid them picking up & transferring ink in unwanted places! This was when my craft knife broke…
 I was really pleased with the next test print, though. To be honest, I really don’t mind the ‘feathery’ effect where the eraser crumbled. What I mind is the knowledge that with use, the eraser will continue to crumble, ruining the stamp very quickly. Not much use, really!
 But this was a very educational test run. I discovered that there is a reason people buy particular brands of eraser or carving blocks for their stamps, and that is quite simply that they are better quality and (in the case of carving blocks) designed specifically for the job. Likewise, my budget craft knife was just not up to the job, so looks like I will have to invest in at the very least a better craft knife, if not one of those lino-cutting tools.
But while the flakiness of the rubber means that these £1 erasers aren’t going to go very far in terms of my stamp-carving ‘career’, I still think they were great value, as their budget price did enable me to test out the principles of carving, to see if I enjoyed both the process and the results. Which I can now confirm I do! It may not last very long, but I’m really happy with how my needle & thread stamp turned out :-).
Unfortunately, I think my next carving experiments will have to wait until after the house-move, when I will have chance to pick up more adequate supplies…
(Check out my stamp-carving experiment #1, where I used a mouse mat, instead of an eraser – it worked!)
I am linking to your post tonight… I did a tutorial on carving a stamp today, but the link to your post is at the bottom. Oh, and your stamp reminds me of the Eye of Horus (or whatever that Egyptian motif is).
I see what you mean about the eye of the needle! It’s a shame the eye is the part that’s going to crumble first, otherwise, I could have pretended it was supposed to be that way (e.g. ‘Today, I will stamp a needle & thread; today, I’m bored with that, and will carve away the needle to stamp an Egyptian-style eye, instead’)! Thanks, Heather 🙂
i also thought it looked like the Eye of Horus. It took me a while to see it was a needle and thread.
I’ve made stamps by couching thread and by putting bits of plastic under fabric- I’ll send you a sample, as I can’t really describe them well, but it may be something you’d like to try making.
That sounds intriguing! I’d love to see a picture, if you have one. I’ve just been investigating collagraphs – I’m definitely planning to some more printing ‘nvestigations’…!